How to set up conversion tracking in Google ads is the most prominent, vital, and tempting question for the massive development of online business in this digital revolutionary era. With this Google ads conversion tracking, you can learn which of your ads, keywords, or campaigns are affecting leads and sales and which are not.
So thoroughly and technically, this data portrays your Google ad spend as worthwhile or wasteful and an authentic elementary tool to understand your return on investment (ROI). As an entrepreneur, a businessman, or a newbie, if you have this data, you can adjust your bidding, keywords, and budget and employ the latest distinctive strategies for more successful campaigns.
Without further ado, let’s learn how do you track conversions on Google ads:
Table of Contents
How To Set up Conversion Tracking In Google Ads
If you search online platforms, you will get hundreds of thousands of AI tools for Google ads, which gives you a variety of strategic marketing materials for ads. But the real question is how to track their conversion. No worries because it’s not rocket science, but it’s a long process, so opt for caution when setting up the conversion tracking.
You will only need two aspects to set up conversion tracking. Firstly, a website to put into your Google tag code. And secondly, the capability to edit your website.
Let’s start your Google Ads conversion tracking journey:
Step One: Make Your Conversion Action
The identical first step is making your conversion action between the Google Ads platform. Following are the fast, effortless steps to do so:
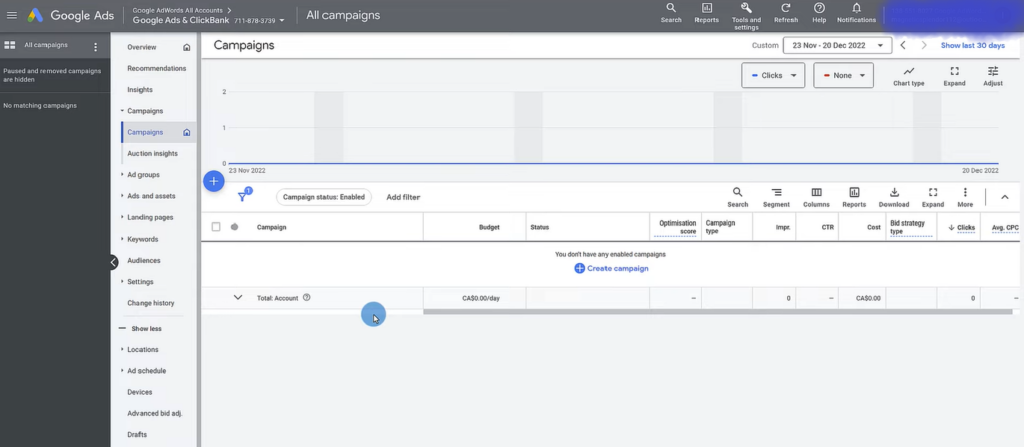
Sign in to Your Google Ads Account
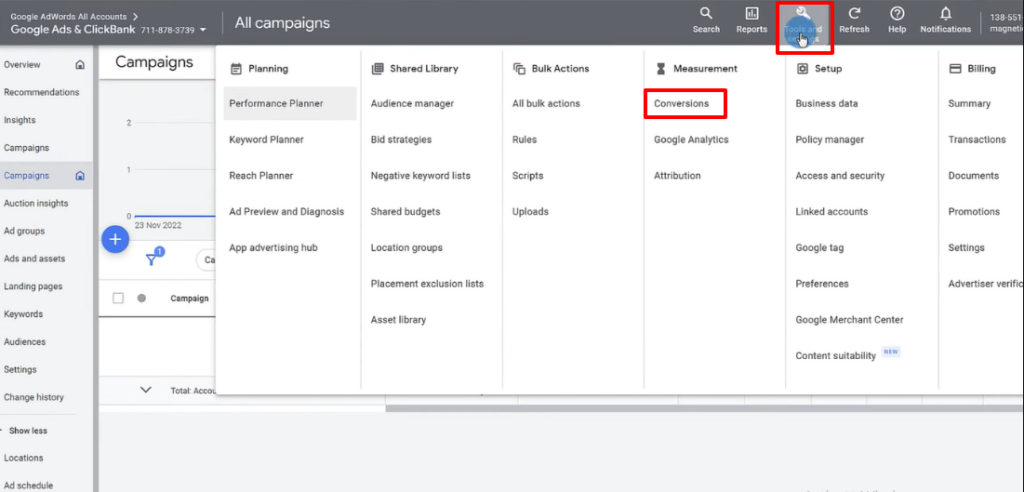
Click the Tools menu from the upper right corner and choose the Conversions option uncovered on the Measurement list.
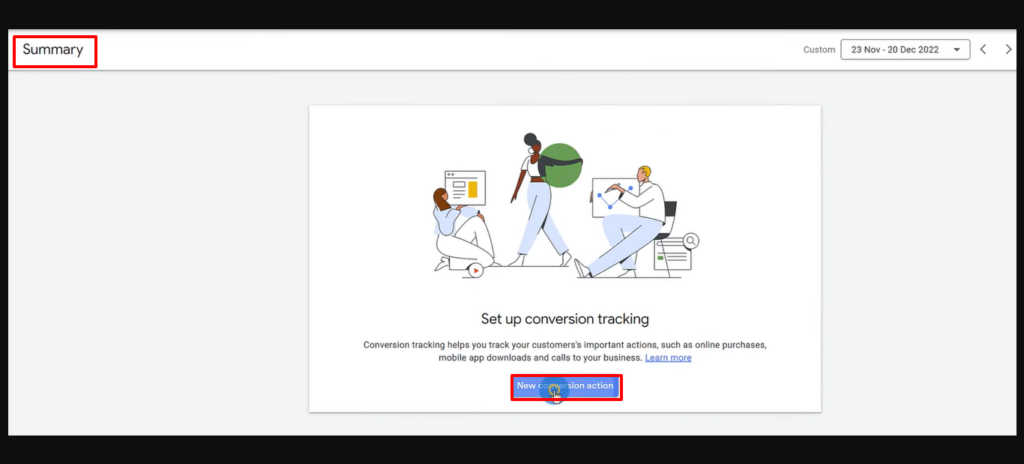
After clicking the Conversions option, you will be brought to the summary section, where you hit the New Conversion Action button.
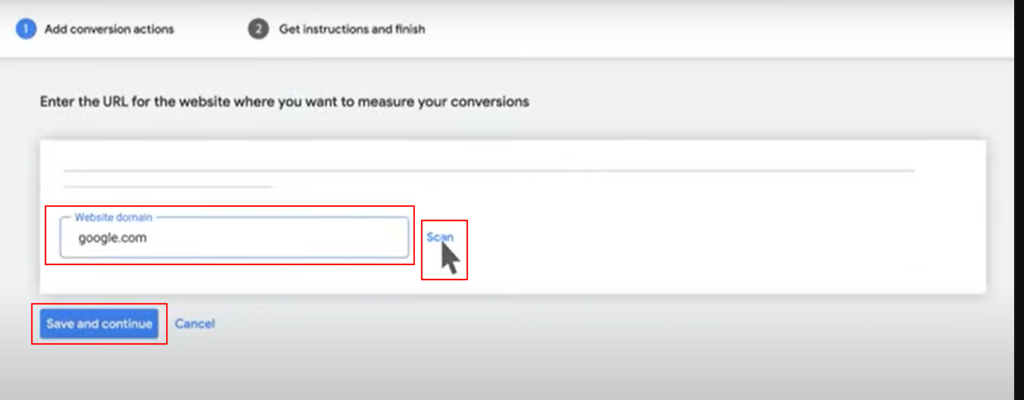
Select your website.

Provide your website’s domain, then click the Scan option.
Now, you will get two options for setup conversation action. One is a URL setup, and the other is a manual setup.
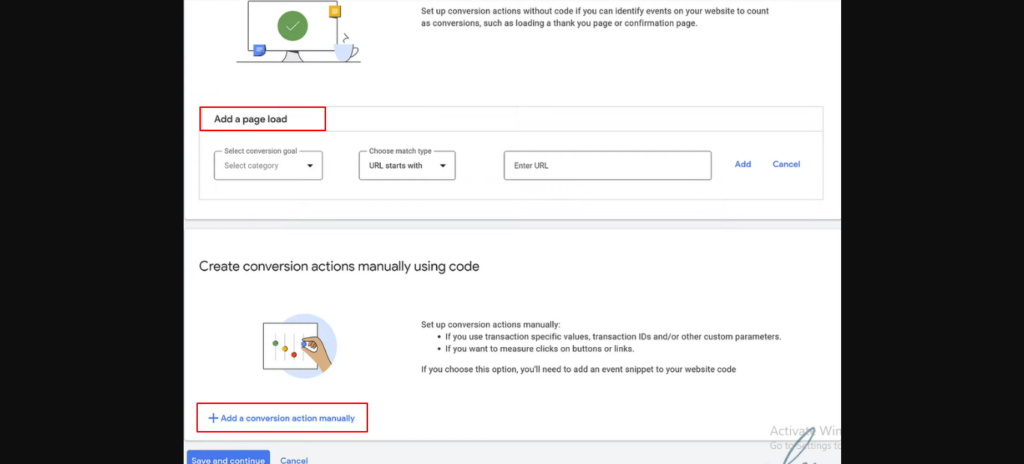
Assuming you are interested in tracking page loads for specific URLs, you should use this URL setup. And it is the most comfortable option to create conversation action and requires installing the Google Tag within your website. You can only rely on your Google Tag to measure the conversion.
A URL Setup
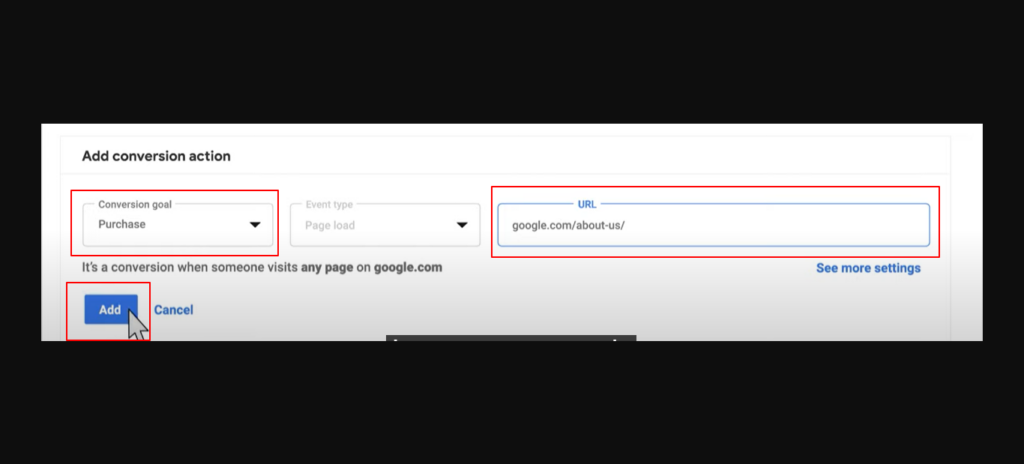
To make a conversation action, you will see three alternatives positively fill in the conversion goal and the URL option, and click the Add button.
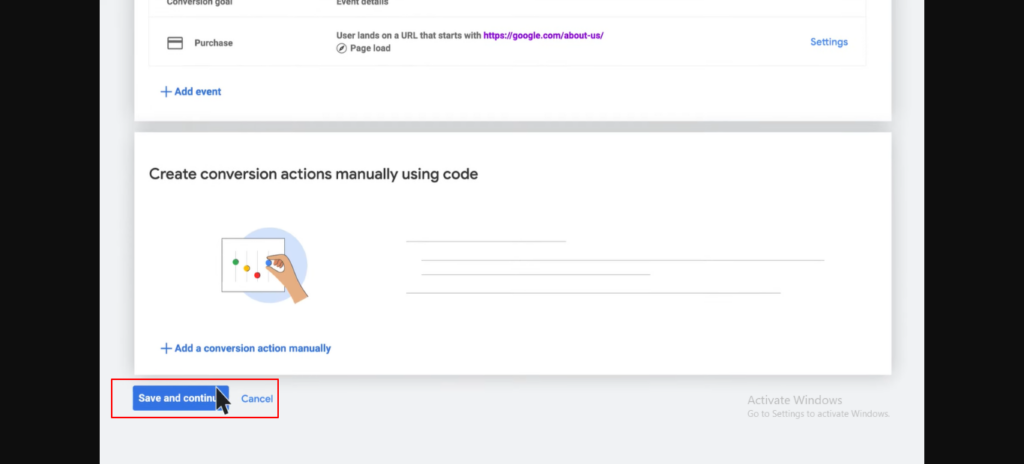
Then scroll to the bottom left side of the page, and you will find a Save & Continue button to click.
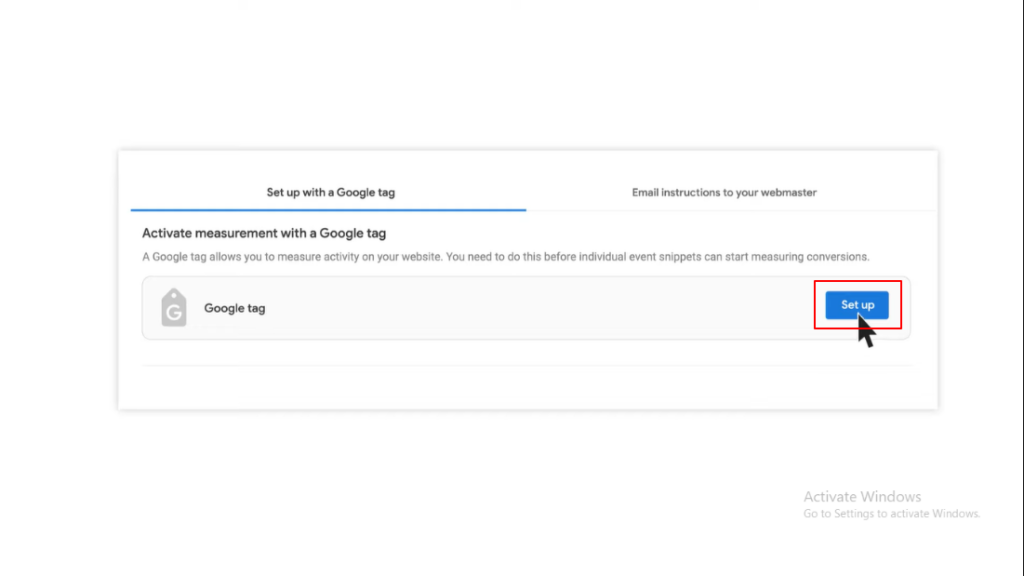
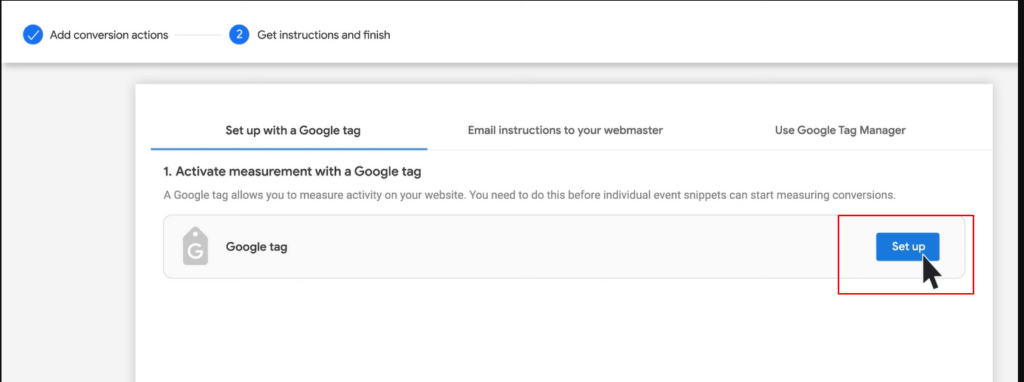
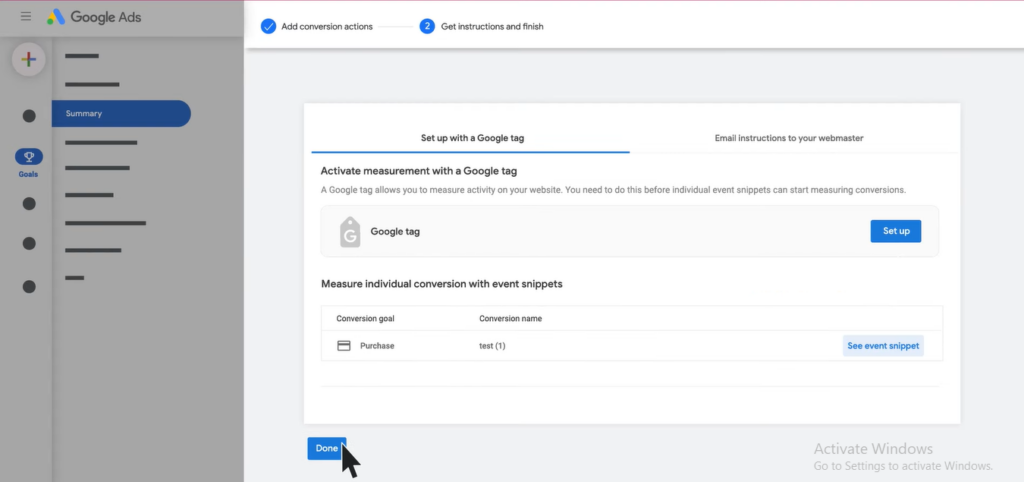
It will take you to another page where you notice a Google tag with a setup button, so hit the button.
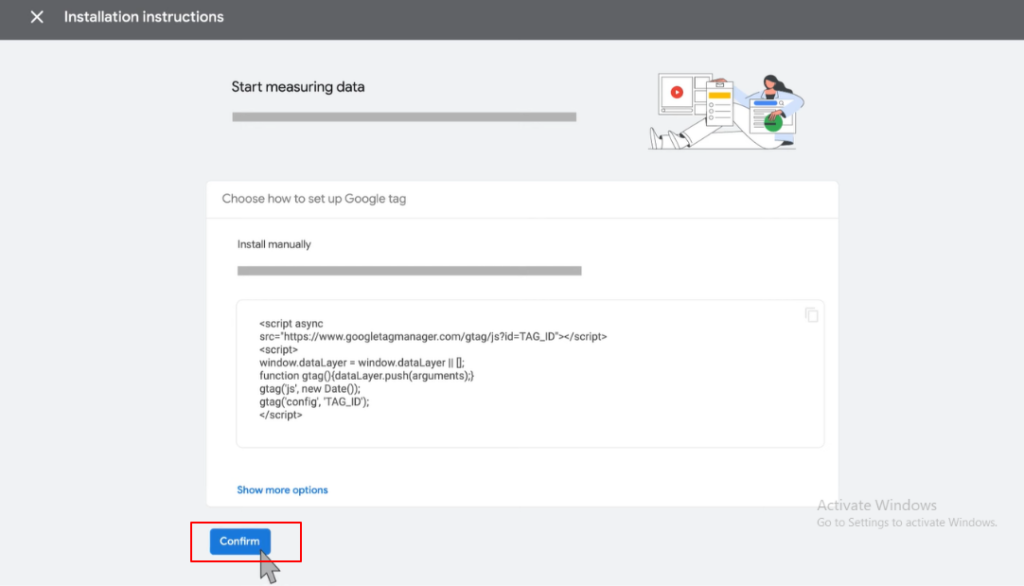
And finally, you will be taken to a page with a confirm button detected at the bottom to complete your URL conversion setup, so hit that button.
A Manual Setup
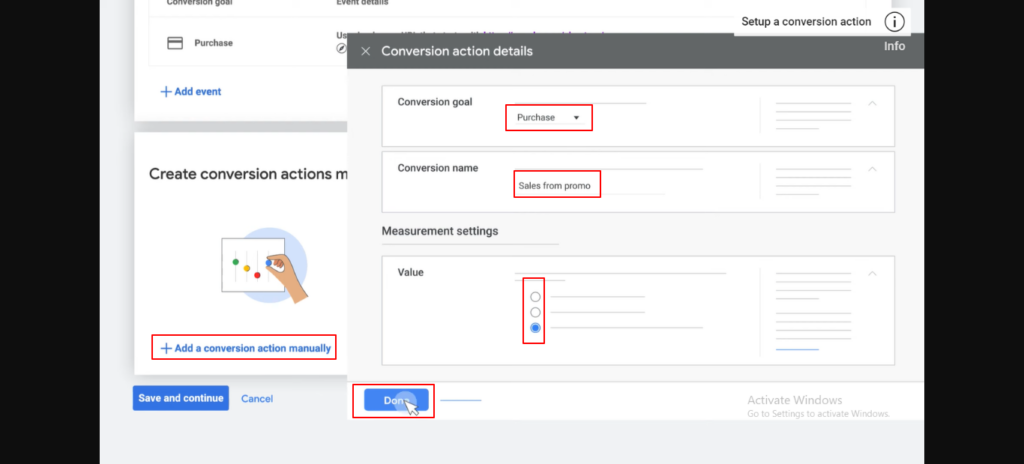
Positively click the add a conversation action manually to create it.

After clicking the option, a new window appears with three distinctive options, such as the Conversion goal, Conversion name, and Value to provide the information. And at the bottom of that window, you will find a Done button and hit it.
Step Two: Set Up Google Tag
After successfully setting up the conversion action, it’s high time to set up the Google tag, and it’s also known as the basis of conversion measurement and page visitor management.
Since there are two distinct options for conversion actions setup, there are also two different ways to set up the Google tags. But like before, you must use the simple one method (depending on your preference) to complete your setup process.
If you select the URL-based option, you need to do the following:
- Produce URL-based conversation action in Google ads.
- Download the “Google Tag” code.
- Place tags on each and every page of your website.
But if you select the advanced method, you need to do the following:
- Download the “Google Tag” code.
- Place tags on each and every page of your website.
- Place the code snipets on the feature you want to track.
Install The Google Tags Automatically
Discover the option to set the Google tag and click it.
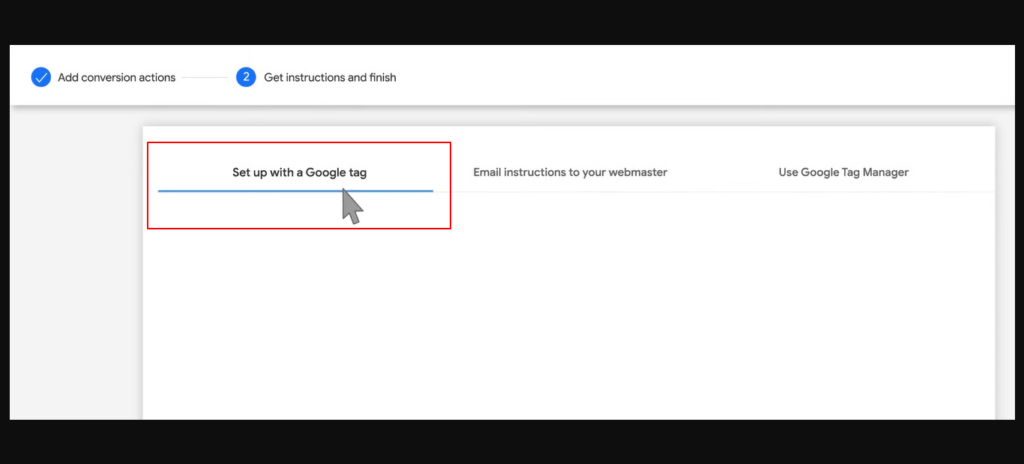
Now you can see a Google tag with a Setup button appears, so hit the button.
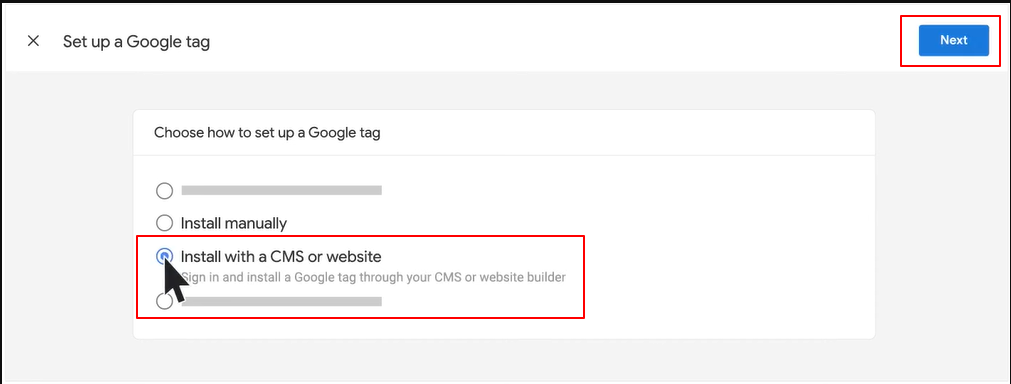
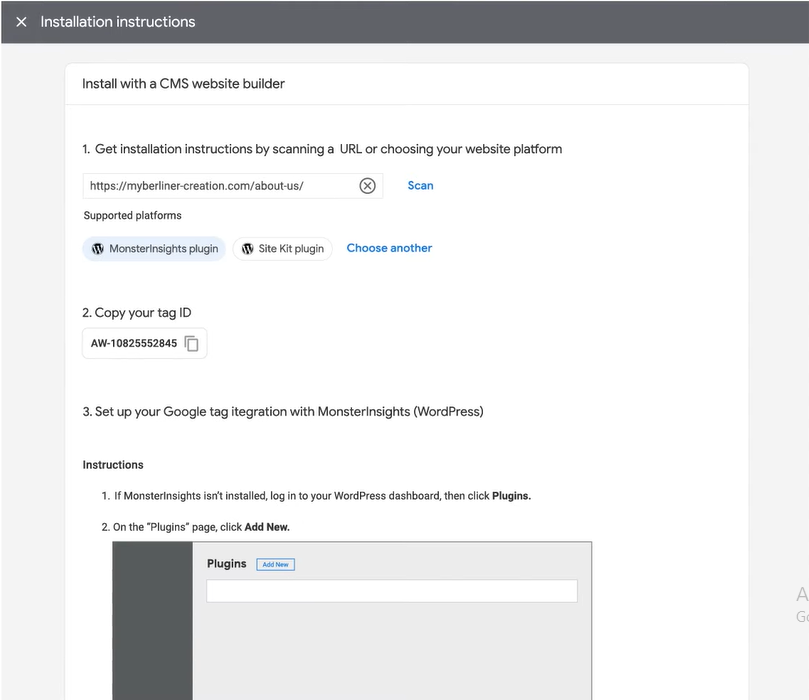
Another page appears with a few options including the “install with a CMS or website” option, click this option, and a Next button will appear, so hit it.
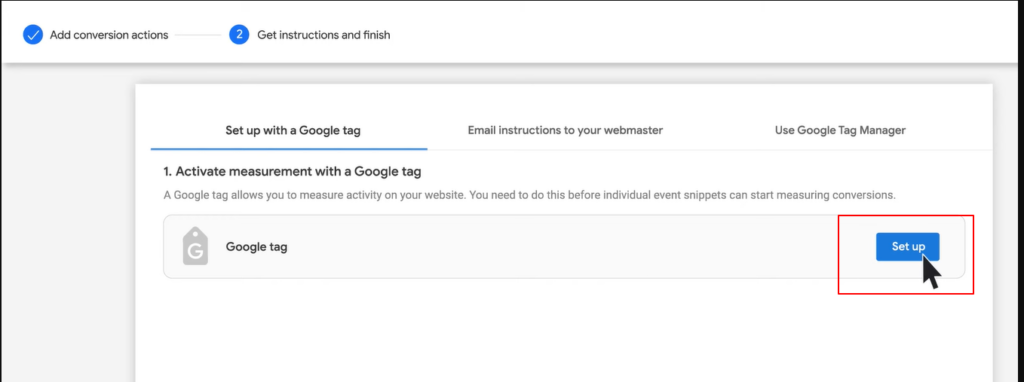
You will brought back to the Google tag setup page and need to click the setup button.
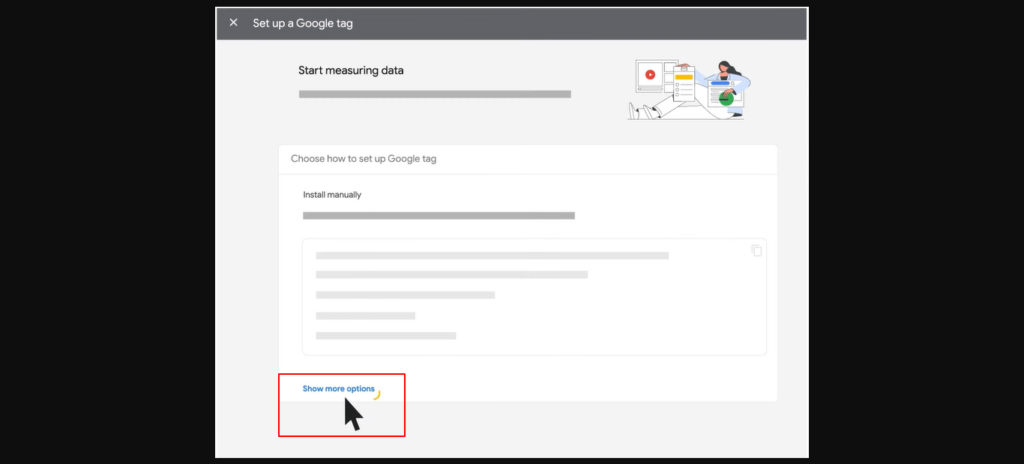
A new window will appear at the bottom of the page, and you will see an option called Show More Options, so click that option.
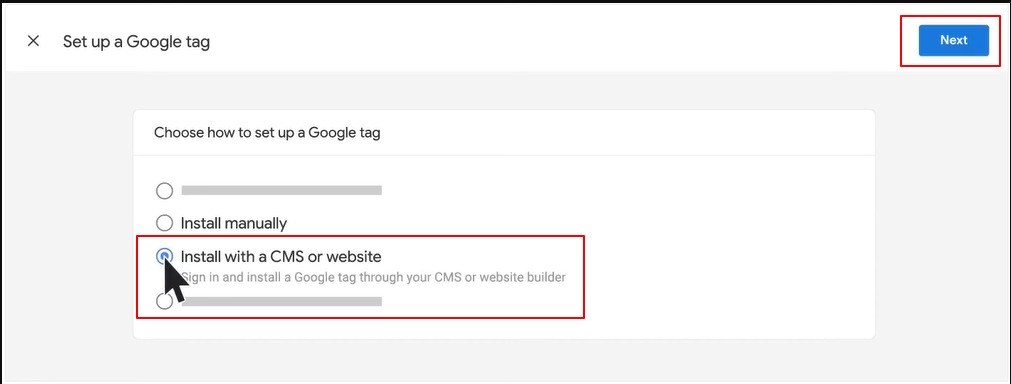
Two more options will be revealed in front of you, but click the option called install with a CMS or website option. And hit the next button afterward.
It will take you to another page, and if you don’t see any implementation option, you have to do it manually.
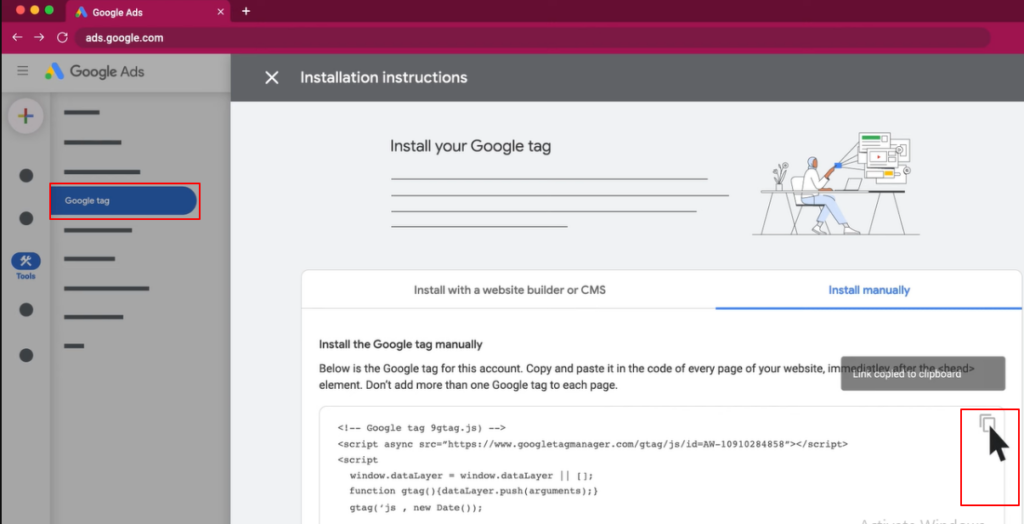
Go to your Google Ads Account and find the Google Tag on the left side of the menu bar. There you see the script and copy it.
Paste the script all over your website to measure your every customer journey.
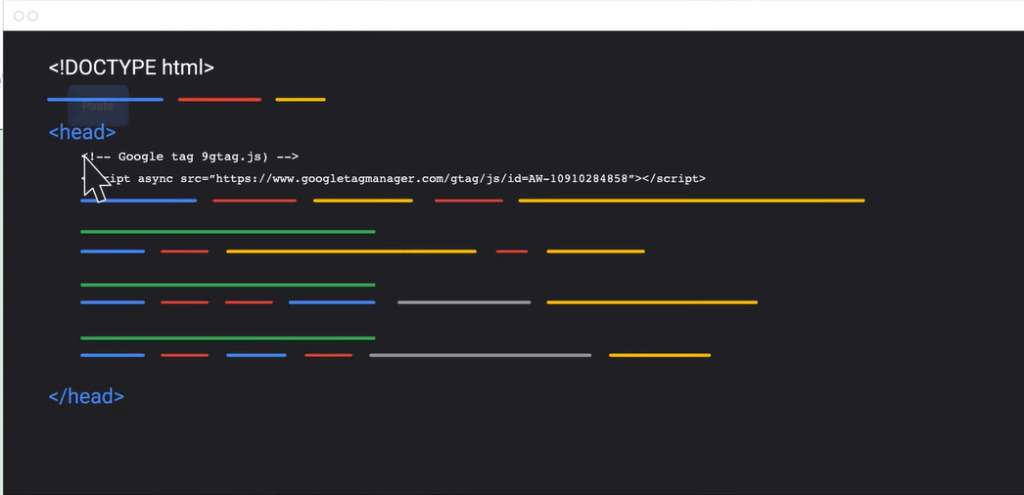
It’s a good practice also to use this script on each page of your website.
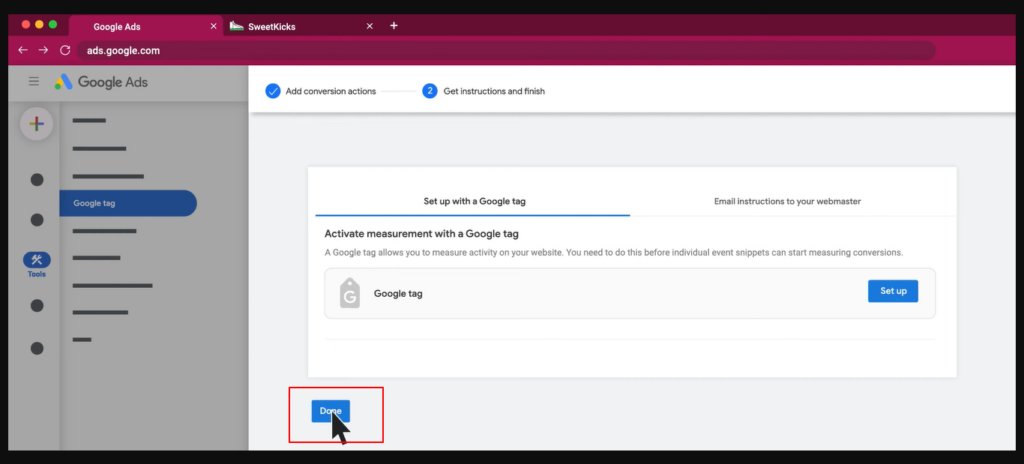
Back to your Google Ads Account and you will see your Google tag option with a Done button, so click the button and complete the Google tag installation automatically.
Install The Google Tags Manually
Let’s check how to install the conversation manually.
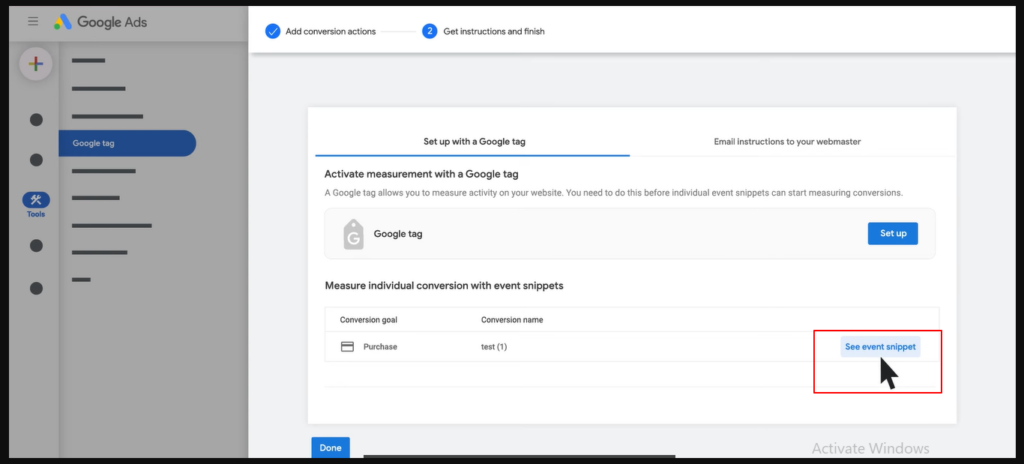
Back to your account, you will see an option called See Event Snippet to click.
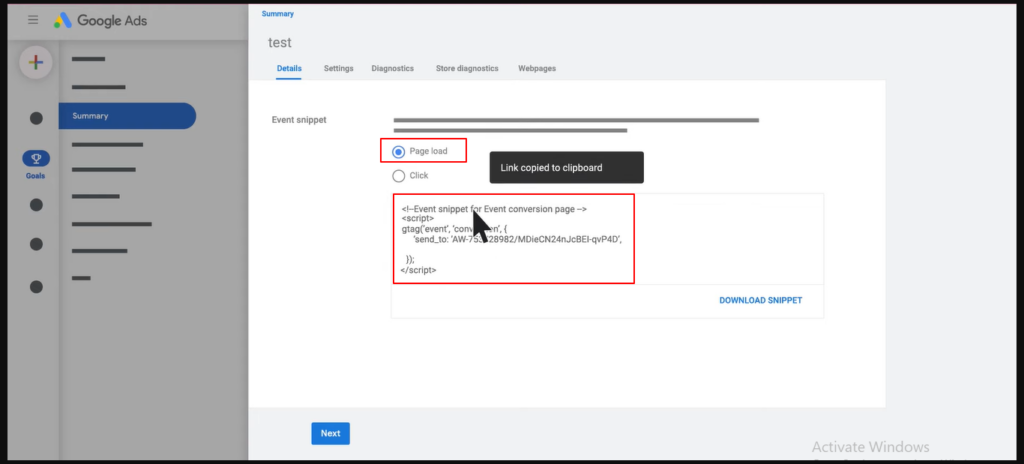
A new window appears to you, so discover the Page Load option and click it, then copy the event snippet.
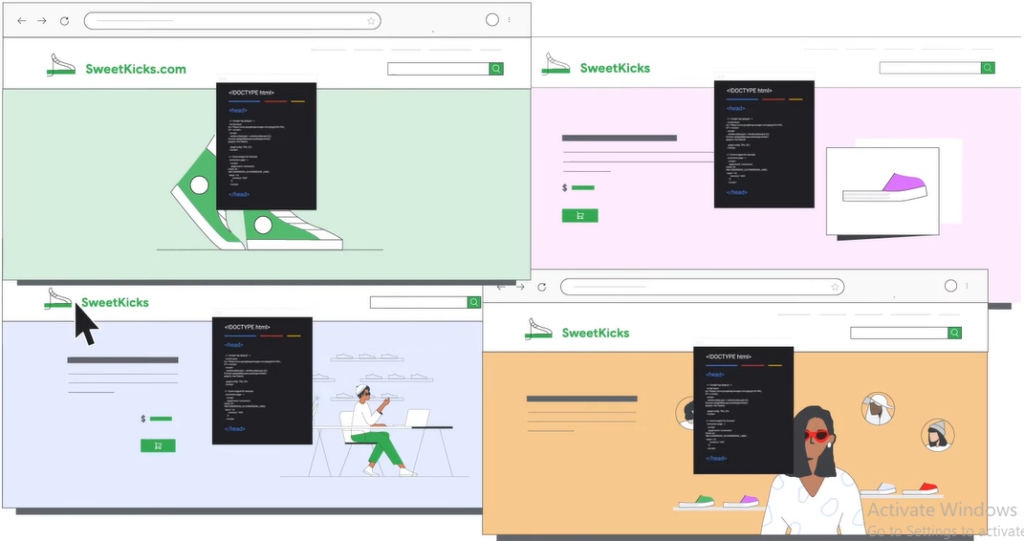
Go to your website and paste it on every page.
Return to the bottom of the page of the event snippet and click the “Next” button.
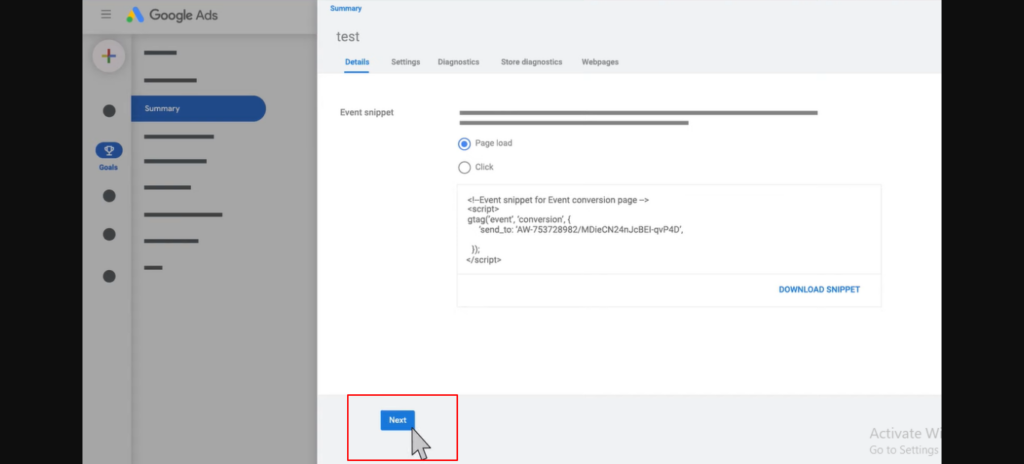
After clicking the “Next” button, the Google Tag page will appear with a “Done” button at the bottom to click. With that, you have completed the tag installation manually.
Step Three: Verify The Google Tag
It is the last and final step, where you will find your Google tag is installed and operates smoothly. So, without further ado, positively follow the below two steps:
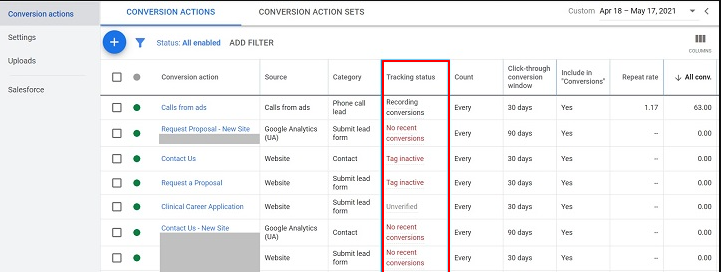
Run for your account and navigate to the Conversions section.
Here, in the conversion action table view, you can see how a conversion action is performing under the Tracking Status column.
Conclusion
This is a complete step-by-step guide for you to grasp how to set up conversion tracking in Google ads. Setting up conversion tracking in Google ads can help you measure the following things:
- How many conversions per keyword generates
- How many conversions per Ad generates
- The number of conversions per campaign develops
- Comprehensive Google Ads conversion rate
- Expenditure per conversion
If you are trying to succeed with your paid advertising campaign on the Google Ads platform, it is imperative and important for you to have a profound knowledge of all of the above.
So, if you have any online business ideas and want to be successful with some paid marketing strategies, then you must opt for Google ads conversion tracking which is truly worth it.
Finally, feel free to share the article with your friends and family if you think this post is good enough for someone who is going to start an online business.


